ko-fi

Translate

Welcome To My Darkside


Sunday, September 1, 2013

Handmade Halloween Paper Roll Candle How-To Skull Jester


Last year I shared a simple candle craft project that I created using glitter skulls I had picked up from Michaels Art and Craft store and thought I would do the same with these cute little glitter skulls I also found at Michaels. If you want to check out last years post here is a link to it. Skull Candle How-to


This candle is made almost the same way except you do not have to cut the skull in half. This skull is smaller and it is made from plastic, not Styrofoam.


To get started here is a list of supplies you will need.


Glue gun and glue sticks. (I used 4 sticks for this project, you may use less or more, it is up to you)


Xacto knife


Masking tape


2 Paper towel rolls

Glitter skulls (purchased at Michaels)

Black and silver metallic craft paint which I forgot to include in the picture. You can purchase the craft paint at Michaels.


Before we get started I want to stress the importance of taking precautions when working with hot glue for those who are inexperienced. It would be good to have a bowl filled with ice and water on the table close to you. In the event that you get hot glue on you, you can quickly submerge or pour on the water it will cool the glue disabling it. It is instinct once one realizes they are burning to try and quickly brush the burning glue off. That only ends with another burn. So please take the extra precaution and save yourself from a nasty burn. If at any point after you start to apply the hot glue to the roll and it gets bumped and starts to tip over (((DO NOT GRAB IT))). It's covered in hot glue and it's HOT! Let it fall, the glue will clean up and it will not hurt the candle drips. You can just glue over any places you don't like. If you are creating with children it is very important that they know this and what to do if glue gets on them.

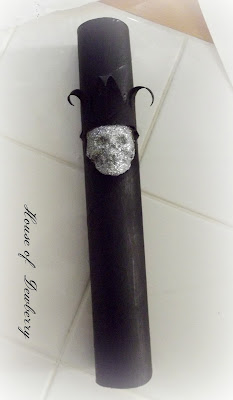
Ok, let's get started! Take the paper roll, choose where you want the skull positioned on it, then make a hole using your scissors or xacto knife, a small circle the size of the back of the skulls head. Next, secure it into the hole. It really doesn't matter if the hole is perfect, you will be applying glue around the head which will fill in any gaps.


Now that the skull is where you want it, you can put a little glue around the face area to secure it.

Time to take the smaller roll and cut it in half to make the Jester hat.


To do that I flattened the cardboard tube and cut some v's into it, I don't measure the cut's out or anything creative like that, I just cut it.


When you are finished cutting the V's, cut that piece in half as well.


Paint the little hat black then let it dry. You can speed things up with a blow dryer. When dry, take a pencil and curl the tips.


Glue the hat onto the skull and candle by placing a drop of hot glue on both sides and pressing each side of the hat onto the candle. Be careful not to burn yourself with the glue.


To create the top of the candle, you will need to tear off several pieces of tape, approximately 3" you will need 5 or so. Take the tape sticky side down and place the tea light on it then tuck it into the hole the sticky side of the tape will stick to the sides of the roll. Continue this until the hole is covered. The tea light should now fit easily down into it and not fall down into the tube.

When done placing all the tape pieces, it should look like this. Fold over the extra tape if there is any.

Paint the paper roll black and let dry.


When dry place the candle onto a paper towel standing upright, this will not only protect your surface from the hot glue drips, it will hold the puddles you will make to support your candle and allow it to free stand. Time to start dripping! But first make some glue puddles around the bottom of the candle, this will keep it from tipping over and should look like this.


Cover most of the candle in drips making sure to cover up and around the skull to fill any gaps and to give it a seamless appearance. It should look like this.


When you are happy with your candle wax effect, it is time to paint the drips black and let it dry.


It should look like this now.


Now for the dry brushing. Take some of the silver metallic paint squeeze a little on a paper towel, then dip your brush. Then take your brush and brush it back and forth on the paper towel to take some of the excess off, then lightly brush the raised glue drips back and forth until you get the effect you want, tear off the paper towel and you're done!


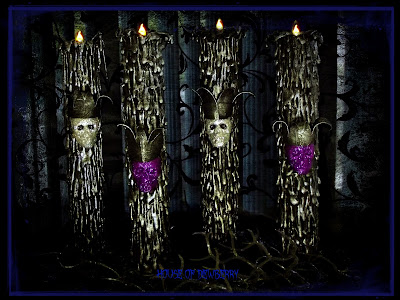
This is what it should look like all finished! You can paint the tea light to match.


Have fun and let me know how yours come out!

Tuesday, July 23, 2013

Handmade Halloween Skeleton Coffin


As the scare season is creeping closer and only 100 days left until Halloween! I wanted to share something I pieced together from a surprise find I found while out for a walk with friends.

Passing a local parking lot, I noticed a small pile of discarded trash, unusual for this lot as it is normally kept very clean form debris, trash, etc, probably why it caught my eye something was out of place. At first glance it was just trash, some papers, plastic, nothing unusual, until I noticed the little black cardboard box shaped as a coffin! I could no longer ignore it!

Not wanting to disappoint my friends who had now stopped to see what in the world I was suddenly so excited about, while they stood giving me the eye rolls and the oh no, here she goes again, look. With all that what else could I do but take it home and make it into a Halloween prop! ha ha ha, therefore, and without any further ado, Ta da!

The possibilities for this coffin box are endless, however, I just wanted to make something simple and quick. I really didn't want it to hit the to do pile. I wanted it finished and ready to display. What I saw for it was something like the Skeleton that I created on one of my faux candles.

I grabbed some wire and tape twisted it together,coated it in hot glue then popped a small plastic skull head on it and done!

At first I wasn't sure I could recreate the skeleton because the first one I made was attached to the candle so it had a support. This one would be semi free standing. Once I got started I knew it would work and perfectly it did! It's completely posable. Moving forward I will definitely be creating more of these.

Well there you have it, a perfect example of handmade Halloween. Taking something and making it into something useful. All of which I love to do! Enjoy have fun and get inspired Halloween is coming!

Monday, February 25, 2013

Macabre Paper Towel Roll Dripping Wax Candles


Happy New Year, Valentines Day, MLK day, Presidents day, and anything else that may have passed and I may have left out. I hope everyone has had a lovely start to this New Year 2013.
It's now 247 days left until Halloween, at least it is here where I am. Right now 247 days may seem like a lot and a little early to be thinking about Halloween , however, any true Halloween enthusiast will tell you each day passing is one less day to get your build on. Halloween is a terrific Holiday to get some family bonding in, so gather the family, pick a project and set some time aside to meet and work together through out the year towards your perfectly chilling Halloween you will be happy you did. It is easy to get started, all you have to do is pick a theme for your next years yard display, Haunted house or Halloween party. Then once the plan is made gather what you need. There are so many great terrorific Halloween resource, How-to's, tutorials ,free printables here on the web. @Garage of Evil is one of them. The garage is a central hub for all things Halloween and it's up all year long, 24 days a week. If you are looking for inspiration, help with a project, anything Halloween related this is the perfect place to start.


So there it is the big inspirational speech for Halloween 2013! I hope you will check in through out the year to see whats new, to get inspired and or be moved enough to create something really chilling.

I thought I would share a couple of my faux candle creations that I have been working on, there are more in the works , however, I will save those for later time. The first one is a Skeleton rising up from the melted wax. It started out as a crawling candle like this one below; just taller.


But then, one of the legs started to resemble an arm reaching out and I started rolling tape and building the rib cage. Then found these skull heads and well there you have it a full bodied skeleton, wax dripping tentacles, holding smaller skulls. It just happens sometimes, if a candle project sits unfinished in my view for any length of time the more chances of it turning into something other than what it started out as is a probability.


I created him the same way I did all the other candles using only paper, glue, tape, paint and my imagination. For those who are new to the House here are the directions to my original faux candles that are made from items you probable have on hand. Not sure if I could do a how-to on this one, he wasn't really planned out and I didn't document the process. Not to worry there will be plenty of how-to's through out the year.


This one is a work in progress. It's a creepy tree with a wicked face which will light up, wax branches and wax arms holding candles spilling melted wax. Not sure how he will look upon his finish, there is always the possibility that he will change as well, one can never be sure.


I will post more picture of it as it progresses. I will be excited to have it finished. Thanks for stopping by and if you have any questions feel free!