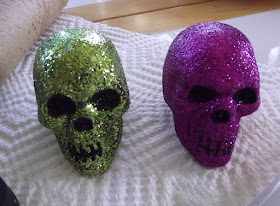
They come with a stick (pick) attached to them because they are used for floral arrangements, etc. I removed the pick as you can see in the above picture. I am only using the head.
What you will need to create your own:
Paper towel roll
Paper towel
Hot glue gun and glue sticks
Excato knife or a sharp knife
Glitter skulls 99 cents at Michaels
Scissors
Masking Tape
Tea Light
Black acrylic craft paint
Paper tea light candles are the best for Halloween as they are safe and durable. You don't have to worry about someone or something knocking them over and starting a fire. They can go anywhere, table, mantel, shelf, window, porch anywhere you like.
My first step was to decide the height I wanted the candle and then cut it down to that size. I then slice the back of the head off of the skull.
For the top of the candle where the tea light will sit. I take the masking tape and "sticky side" down I place the tealight on it, then push the tealight and tape down into the top of the roll just far enough for the tea light to be level or if you like a little lower than the top of the roll. I do this three or four times folding the tape over and securing it to the outside of the roll until the top invert is covered. This will give support for the tealight.
Now I position the skull to the center of the paper towel roll and cut a circle. The circle does not have to be perfect it just needs to be large enough to fit the back of the skulls head into it.
Now I take the skull and fit it into the hole and drip a few drops of glue to secure it, again, if it doesn't fit perfectly it is ok, because the glue will seal the gaps.
If there is a large gap you can tear a little piece from the scraps and glue it on.
Now place the bottom of the paper towel roll onto the paper towel and start dripping glue around the middle letting it run down the roll and onto the paper, let it cool. This will help stabilize it and the candle will stand on it's own.
Once the glue has cooled you can tear the paper off I normally leave it until I am done gluing but if you find the paper cumbersome you can remove it. If by chance your candle does knock over while you are dripping the glue do not try to catch it, you will get burned! The candle falling will not hurt it, you can just re-drip where it messed up during the fall. Remember to be careful because the glue is really hot!
Now that the candle is balanced you can drip from the top. You can make as many drips as you like; a lot or a little it's up to you and how you want the candle to look. I covered most of the roll but it really doesn't matter it looks great with fewer drips as well. At this point if you have a duel temp gun you can turn it down and let it cool. If you don't have a duel temp you can simply turn the gun off and let it cool a little. This makes the drips run slower and cool quicker. Once cooled, drip some drops around the face letting it run down the forehead and sides of the face filling the gaps.
With the glue still cooled rim the top of the candle adding more in some spots to make it look a little less level and more like a real candle looks after the wax warms up and melts some areas more than others. If you have turned off your glue gun and it has cooled too much you can turn it back on heat the glue a little and turn it back off again. Cooler glue works better for the top.
Now comes the paint. I used black acrylic craft paint and just slathered it on making sure to get all the nooks and crannies. I carefully painted the drips around the face and the tea light to match. That's it all done.
Now you can make more!
I made one in every color : )
I hope if you have tried this and you are happy with your candles you will share them with me, drop me a link so I can see them. If you need help or I have left something out, please feel free to contact me and I will be happy to answer any questions.


